Showing posts with label Netbeans. Show all posts

Monday, October 12, 2015

Tapestry5, JPA 2 and Hibernate

The documentation for Integrating JPA found on the Tapestry5 website was lacking.
  1. It doesn't tell you that you have add the Tapestry-jpa dependency in you project POM
  2. It uses EclipseLink
  3. Explicitly tell you to use JPA 2.0 NOT JPA 2.1;
So, I had a few problems to fix after reading and following the docs. With much tinkering with my Tapestry5 (5.4-beta-35) project, I figured out:
  1. To add the Tapestry-jpa dependency
    <dependency> <groupId>org.apache.tapestry</groupId> <artifactId>tapestry-jpa</artifactId> <version>5.4-beta-35</version> </dependency>
        

  2. Hibernate 4.2 instead of EclipseLink
    <dependency> <groupId>org.hibernate</groupId> <artifactId>hibernate-entitymanager</artifactId> <version>4.2.20.Final</version> </dependency>
  3. Edit the persistence.xml header so it reads version=2.0 instead of 2.1. This is because my Netbeans IDE can generate the persistence.xml file but defaults to 2.1 version instead of 2.0.
And if you get a javax.persistence.PersistenceException: Unable to build EntityManagerFactory error during the build, you probably didn't add a hibernate.dialect property in your persistence.xml configs.

Thursday, October 8, 2015

Tapestry5, JPA, Netbeans and a FilerException

Tapestry5.4 supports JPA out of the box which is nice. Also Netbeans supports JPA, doubly nice. Now if you're using 2 or more Persistence Units, you have probably encountered a FilerException when you try to compile or run your project. This shouldn't be a problem if you're using only single Persistence Unit. I suspect the fix would be the same if you encounter the same exception.

java.lang.RuntimeException: javax.annotation.processing.FilerException: Attempt to recreate a file for type {myclass}

The {myclass} here is always an entity class.

I think, a secondary symptom of this is if all your entity classes are all in a single package. This should be the case if you're doing a standard Tapestry5 web application.

The fix to this is to edit the Persistence Unit and add a  property and explicitly declare the entity classes on the Persistence Unit.

<persistence-unit name="PayrollPU" transaction-type="RESOURCE_LOCAL">  
   <provider>org.hibernate.ejb.HibernatePersistence</provider>  
   <class>cu.ictso.miscapps.entities.Departments</class>  
   <class>cu.ictso.miscapps.entities.Employee</class>  
   <class>cu.ictso.miscapps.entities.Groups</class>  
   <class>cu.ictso.miscapps.entities.ViewAttendance</class>  
   <exclude-unlisted-classes>true</exclude-unlisted-classes>  
   <properties>  
    <property name="javax.persistence.jdbc.url" value="jdbc:sqlserver://localhost;databaseName=DTR-Payroll2;Integrated Security=false"/>  
    <property name="javax.persistence.jdbc.user" value="PayMaster"/>  
    <property name="javax.persistence.jdbc.driver" value="com.microsoft.sqlserver.jdbc.SQLServerDriver"/>  
    <property name="javax.persistence.jdbc.password" value="123456"/>  
    <property name="javax.persistence.schema-generation.database.action" value="create"/>  
   </properties>  
 </persistence-unit>  

Here's an example Persistence Unit.


Friday, February 27, 2015

Netbeans 8 on 4k displays

Running Windows 8 (or 8.1) on a 4k display is pretty sweet once you get your settings right. Even the Metro apps run good on a 4k display.

The problem here is the 3rd party apps like Netbeans 8. They don't show right because of scaling issues. Fortunately is can be easily fixed by doing a bit of editing a text file.

In order for Netbeans 8 to display right in 4k resolution displays on Windows 8 you have to:

  1. Open for edit netbeans.conf file. It should be located at c:\Program Files\Netbeans 8.0\etc folder 
  2. Change -J-Dsun.java2d.dpiaware=true to -J-Dsun.java2d.dpiaware=false
And we should be set.

Wednesday, March 19, 2014

4 code editors you should be looking at (and none of them is Atom)

  1. Notepad++. I like it because its snappy and an outright replaced to notepad on Windows systems. It also have a bunch of plugins for everything. My favorite use of Notepad++ is to view and format JSON, It's also a pretty capable source code editor with line numbers and color highlighting for a lot of languages.

    Notepad++

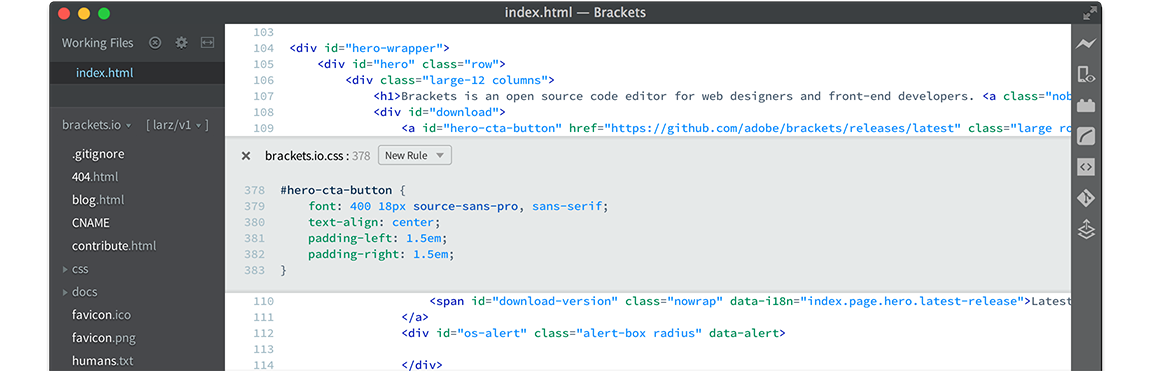
  2. Brakets. This free code editor is geared towards JS and HTML5 scripters - frontend people; it has this cool feature called "live html" where you connect Brackets to a live server and "edit" the site live. It also has a lot of plugins, I especially like the color/swatch plugin where when you edit CSS colors, it pops up a color selector helping you pick the right shade of blue or whatever. It's also nice that it understands CSS dialects like Less and SaSS.

    brackets.io

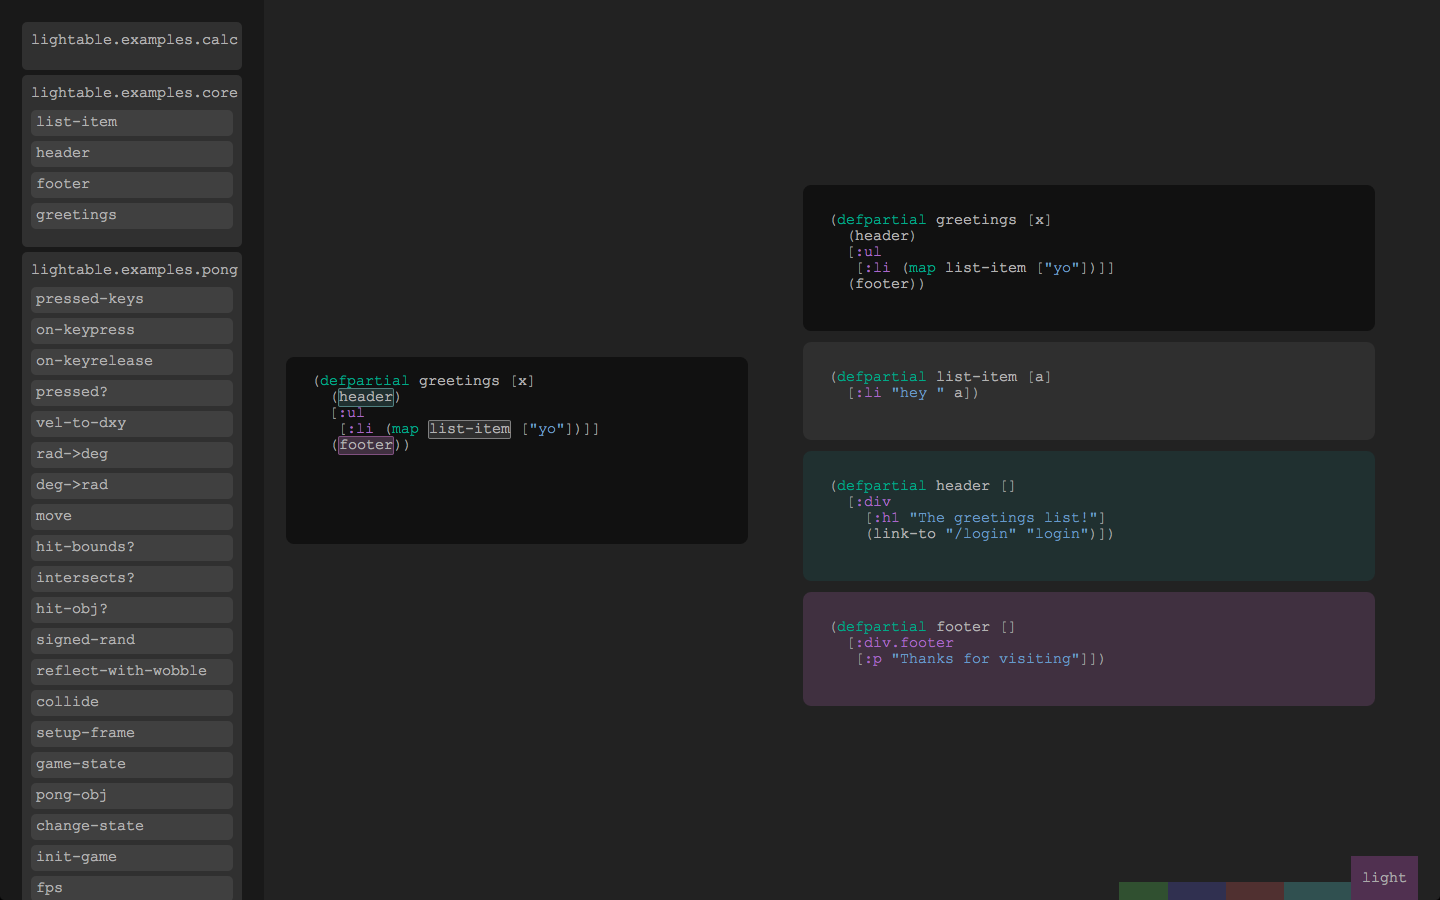
  3. Lighttable. Although its sort of still in the dev stages it's quite stable on my ElementaryOS machine. It HAS GOT TO BE the coolest IDE I've seen and use.  Lighttable has this killer feature where it cross a REPL with a source editor giving you the feel that you are editing running code. It also has this notion that a file is not the smallest unit of organization but a function is. Did I mention that it's free?

    Lighttable

  4. Netbeans 8. Aside from being free, Netbeans has got to have the some of the best toolsets for Java development found on a single IDE. It has wizards for all of Java world's coolest libraries like Hibernate, Spring and Swing. It also has killer support for web technologies like AngularJS, HTML5, Less and SaSS. Aside from that, Netbeans also has built in support of workflow units like Maven, Git and Mercurial. It also has a pretty lively plugin ecosystem making able to support other languages not just Java like Ruby with Rails.

    Netbeans

Monday, February 10, 2014

ElementaryOS, Netbeans 8 and that smexy new Terminal


So, I downloaded the Netbeans 8 which still in beta but I like it! Some of the new things I like are:

  1. The new smexy Terminal allowing me to run bower, grunt, yeoman commands without opening a separate Terminal - A BIG DEAL TO ME!
  2. New themes allowing for easier-on-the-eyes coding - ie. Less eye strain due to glare
  3. Better code hinting to JavaScript libs - although I only tried AngularJS
  4. Cordova or PhoneGap support
Now just for icing on the cake, I'm been running around with ElementaryOS which I advise people to try out especially that Microsoft was really really killing WindowsXP and you can't stand Windows 8. ElementaryOS is just a sweet mod to Ubuntu/Debian so it's pretty easy to install and use. And about that icing on the cake, Netbeans 8 "seems" to boot up and run faster on this relatively old Core2Duo 2GB machine. When I was running Win7 on it, it kinda felt sluggish.

Some tips if you're new to Netbeans and you're doing web development:
  1. Install the Emmet and Explore-from-here plugins
  2. Print out the Keyboard Shortcuts - Try out the Ctrl+Tab to navigate between view
Keep on coding.

Thursday, June 6, 2013

Our Database: Dropping MySQL for MariaDB

This is part 2 of my Resteasy Tapestry with AngularJS tutorial. We will be fleshing out the database that we will be using for this tutorial/project.

I will be using MariaDB in this. I could use MySQL but ever since Oracle took it over, I've been slightly uncomfortable in using/recommending it. Besides, MariaDB is a drop-in replacement, so any code you wrote (or will write) for MySQL will be OK with a MariaDB database.

As not to be bogged down by database design details, we'll just have a 1 table database for Contacts.

As for our management tool, we will be using Netbeans. Yes, Netbeans. (I'll let that sink in.)

You can manage your MariaDB database in Netbeans just by registering it and running queries against it. And it does have a few GUI features like a 'Create-Table' wizard. To register your MariaDB database(I'm assuming that you have Netbeans and MariaDB installed already) do the following:


  1. Download the java-client driver  
  2. In Netbeans, go to the "Services" tab, right-click on it and select "New Connection"
  3. Pick new driver
  4. On the new window, locate the java-client driver you just downloaded
  5. Set the driver class to: org.mariadb.jdbc.Driver
  6. Pick a name for this new connection
You should be then able then to connect to your MariaDB instance. To test, try executing the command:

create database tangledb;

That should execute without a problem. As for creating a "Contacts" table, that should be fairly straight-forward. Just open up the new tangledb database and on the table folder, right-click and add new table.

As for the columns:
- id (integer, pk)
- firstname (varchar(50), nullable)
- lastname (varchar(50), nullable)
- nickname (varchar(50), not nullable)
- birthday (date)
- mobile (varchar(15), nullable)
- landline (varchar(15), nullable)
- e-mail (varchar(150), nullable)

Click OK and there you have your MariaDB database.

Monday, April 1, 2013

Code fasta, Fasta, FASTA with zen coding

Zen wunz go fasta!
If you're familiar with Warhammer 40k Orks, then the reference should be appropriate otherwise, WHOOOSH!

What is this zen coding BS then, you might ask? Well, zen coding is something Google came up with to write out HTML faster. Zen is not a technique mind you but rather an editor plugin for your favorite IDE allowing you to write in abbreviations and then expanding it to completed code.
You can basically write shit like this:

div#page>div.logo+ul#navigation>li*5>a

And have it expand to this:

<div id="page">  
     <div class="logo"></div>  
     <ul id="navigation">  
         <li><a href=""></a></li>  
         <li><a href=""></a></li>  
         <li><a href=""></a></li>  
         <li><a href=""></a></li>  
         <li><a href=""></a></li>  
     </ul>  
 </div>

We should be able to see the convention quite easily and as you can see quite convenient in handling with repetitive code. Unless, of course you're someone who like's typing, then that's another thing altogether.

This also works on Less and Sass code among other things. And it also comes as Netbeans plugin which is very nice. Other implementations are also available.


Friday, December 21, 2012

Installing and working with CoffeeScript in Netbeans

Netbeans Plugin page
Netbeans already has excellent support for JavaScript fortunately it also has a plugin for CoffeeScript written by a guy name Denis Stepanov. Although its missing a "set target folder" feature and only supports CoffeeScript 1.3.3, its still good. The thing here is that it just works. I don't need to install node.js (and the associated npm) to translate CoffeeScript to JavaScript.

To add CoffeeScript support in Netbeans, we start off downloading the plugin. When done you install it via the plugin page. You should restart Netbeans after and that's it. 

After the restart, try creating a new project. There should be a new project type called CoffeeScript Application. And you should be able to add CoffeeScript scripts to existing web projects also. Just remember the limitation that where you wrote your CoffeeScript is also where the output JavaScript will be saved to.

Next post will be about CoffeeScript data types and functions.


Friday, May 4, 2012

My week of Sproutcore and Netbeans

After running around with knockout, I decided to try out sproutcore for a week. The first task was getting it installed. My dev maching is running the lastest from Ubuntu (I think its 12.04 LTS). My install experience wasn't exactly pleasant. I followed the Sproutcore's install guide to the letter and it resulted is a dozen or so of can't compiles and missing libs - I did fix the errors eventually.

With my Sproutcore running, I started following the tutorials and by the "TodosThree" part I was writing a fair amount of JavaScript. I need an IDE for this work - Netbeans.

Sproutcore and Netbeans

Netbeans doesn't officially support Sproutcore but that isn't really a problem. Sproutcore is like 95% JavaScript and Netbeans has excellent JavaScript support. It's just a matter of "creative" use of Netbeans. The trick is to create a "PHP Application with Existing Source" and point it to your Sproutcore project folder. Here's the procedure:

  1. New Project > PHP Application with Existing Source
  2. Sources Folder should point to your Sproutcore project folder (not the apps folder)
  3. Change the Project URL to https://localhost:4020 also remove the index file
  4. And your done!
As for the rest like running the "sproutcore gen app" commands. You'll have to run that outside Netbeans and on the terminal. Its not really a big deal. 

BTW, code intellesense amazingly also works, I didn't expect it to work but it does. BONUS!


Wednesday, February 15, 2012

Unholy union: Glassfish and MSSQL

I'm in a situation where the data is on a Microsoft SQL Server and I want to use Glassfish and J2EE. And all of this done inside Netbeans.
SQLServer + Netbeans?
Getting Netbean's version of Glassfish to work with MS SQLServer 2008 is a trick. When you start it up and open the Admin console webpage you'll head to the Resources > JDBC > JDBC Connection Pool and open make a new connection. You'll finish out the wizard until you try to ping the server. FAIL!

The problem is Netbean's version of Glassfish doesn't have the correct jars. Open C:\Program Files\glassfish-3.1.1\glassfish\lib; take a look and facepalm at this display of fail from Oracle.

Lets not dwell on that.

So we need a JDBC driver and a JDBC driver we shall get. Don't worry although its Microsoft, it won't cost you a thing. Documentation here. Driver here and just drop the jar file into that folder you just opened. Use the sqljdbc4.jar. Don't forget to restart the Glassfish server.

Now we redo the step in creating the JDBC connection pool resource. Here is what I did:
  1. Named the Pool: MSSQL2008
  2. Set the resource type to: java.sql.driver
  3. Set the driver class name to: com.microsoft.sqlserver.jdbc.SQLServerDriver
  4.  Set my properties to the following values:
    • URL = jdbc:sqlserver://{iptoserver};instanceName={name};databaseName={defaultdb};integratedSecurity=false;
    • user = my admin username
    • password = duh!
Troubleshoot if the ping test fails.

Don't forget to create a JDBC resource after you succeed in creating your connection pool in Glassfish. You'll need it if you want to get database access via JNDI.

Thursday, January 5, 2012

Learning Scala is screwing up my head

After learning Groovy, I decided to learn Scala. I'm in my 2nd week of learning it and its screwing up my head. I think its has more to do with the programming paradigm that Scala is in. Scala is a multi-paradigm programming language designed to integrate features of object-oriented programming and functional programming. 

Scala 2.9.1 in Netbeans
So to get started, I download and install Scala and got Netbeans to work with in. Scala in Netbeans is pretty sweet. You can follow all the Scala tutorials using the interactive shell and then try your hands on writing Scala scripts. 

The object-oriented part is cake but the functional programming part that what's screwing up my head. All this reminds me of what I had to go through learning object oriented programming coming from a procedural programming language. I'm expecting to go half-mad, a nervous breakdown and then suddenly just get it. 

This is going to be wild ride.

Sunday, December 11, 2011

Enable that Drupal Module from inside Netbeans

Drupal development - module or theme - in Netbeans work but you'll have to deal with a few quirks, gotchas and trade-offs. One of my pet peeves is where that I have to open a command outside of Netbeans to use Drush. I have gotten use to my Java flow where I can call or use Maven or Ant inside Netbeans. I don't have to suffer anymore! Because I have found a plugin that makes Drupal development in Netbeans cool, pleasurable again. Introducing NDDT or Netbeans Drupal Development Tool.

NDDT is developed by Jamie Holly who just happens to be the owner of Holly Information Technologies which owns the code to NDDT. Amazingly he is currently allowing Drupalist to freely download the plugin as a NBM package. A NBM package is the file format for Netbean plugin. 

I haven't tried out all the features as of yet but I've noticed that I've been using three features of the NDDT everytime for the past week since I installed NDDT.
  1. Drush console - No more opening the admin module page for me. I just run pm-enable from Netbeans.
  2. The snippet and templating feature - You just gotta love any feature that cuts down on the typing
  3. Drupal API search feature - I don't have to keep open a tab for the api.drupal.org site. 
Any Drupalista who uses Netbeans SHOULD give NDDT a spin. It's FREE and it WICKED!

Saturday, October 8, 2011

Writing new Java is Groovy

Way back when - this was when I was in college, you had to choose a programming language. Unfortunately for my instructors, I wasn't the sheep they thought I was. I wasn't about to be cowed into using VB6, which by the way, they were ramming it down the throats of my classmates - well most of my classmates. A few of us decided it was our duty to give them the finger and tell them to shove where the sun don't shine.

So I looked at and tried a lot of stuff during this time.
  1. C/C++. Its like using a chainsaw without the chain guard - its liable to cut of your hand when you do something stupid. Damn overflows and pointers in the wrong addresses.
  2. Pascal and/or Delphi. Very cool IDE but very heavy with the keywords. I also just didn't like the language - this is more of a personal preference rather than something that has technical merit. So, Pass.
  3. xBase languages like Clipper. No IDE during that time so programming was done with notepad and a stash of batch files. No dice.
  4. Powerbuilder. It was the gold standard for rapid software development that time. It just cost a couple thousand bucks for the whole thing. Ouch.
So that just leaves Java, which was still owned by Sun Microsystems. It was free, no pointers, had several IDEs to choose from and language idiom that "spoke" to me. That was 10 years ago and like any good hack, I'm still learning, hacking, tweaking new stuff. And this is where Groovy came into the picture.

I'll be the first one to admit, Java as a programming language is far from perfect. Java code is overly verbose is one such flaw. Groovy is more leaner but its still Java; consider the fact that Almost all Java code ever written is also valid Groovy. 

To make my point, take a look that this standard but rather trivial Java POJO.

import java.util.Date;

public class Person {

    String firstName;
    String lastName;
    Date birthDay;

    public Person() {}

    public Person(String firstName, String lastName, Date birthDay) {
        this.firstName = firstName;
        this.lastName = lastName;
        this.birthDay = birthDay;
    }
    
    public Date getBirthDay() {
        return birthDay;
    }

    public void setBirthDay(Date birthDay) {
        this.birthDay = birthDay;
    }

    public String getFirstName() {
        return firstName;
    }

    public void setFirstName(String firstName) {
        this.firstName = firstName;
    }

    public String getLastName() {
        return lastName;
    }

    public void setLastName(String lastName) {
        this.lastName = lastName;
    }
}


No suprises here. I will concede that this can be generating by the IDE but you can't escape the fact that the code is still extensive. Compare this to the equivalent Groovy code.

class Person {
    String firstName;
    String lastName;
    Date birthDay;
}

Seriously, that’s the whole class. Groovy classes are public by default, as are Groovy methods. Attributes are private by default. Access to an attribute is done through dynamically generated getter and setter methods, so even though it looks like we’re dealing with individual fields, we’re actually going through getter and setter methods.

Also Groovy works with my favorite Java framework, Tapestry5 and is supported by Netbeans since 6.5.

And like Ash in Army of Darkness getting the powered glove in place of his right hand: Groovy.

Friday, March 25, 2011

Yeah, I run Ubuntu...Wanna make sumthin' out of it?


Yes, I know my desktop looks cool. It also very, very sweet! My 3 year old ACER laptop which has only 1gig of RAM is running quite smoothly and responsively. To quote yoyong ucab,
"Best performance kaayo."
Trust me on this - when you see this thing run Vista, it makes you wanna cry. Vista is the OS that was bundled with this thing when I bought it and it so f'in slow. And to add insult to injury its Vista Starter. Yes. It's the fork-over-more-bucks-so-you-can-run-more-than-3-apps Vista Starter OS.

You will also notice that I got Netbeans running on this thing. I am a developer after all and its gravy. I even got to sync my code from my kenai.com repo.

You should be looking at Ubuntu on you next laptop. I'm beginning to question the wisdom of paying for the "other" operating system when there's this.

Now, I wonder if I can set this one up as an Android dev/test machine...hmmm.

Wednesday, January 5, 2011

Drupal 7 is out! Everything in my world is right!

 Drupal 7 is out! Everything in my world is right!

Downloaded it which was at the time a good idea. It was around 2.0mb which I though was to be a quick download. Well, not really - me thinks there are a lot of people also trying to get their grubby hands on this.

So fast-forward a bit, unpacked it - I use 7zip - and installed this puppy. It installed beautifully as you can see from the screen shot.

First impressions?

Web2.0 goodies abound like overlays, rollovers and such.
Check this screen shot of the new new article interface. As you can see its clearly an overlay - it uses JavaScript for those who fail to grasp the obvious.

It doesn't sound so bad - although, they use a lot of JavaScript, its used with a purpose and not that "use JavaScript here bcuz it l33t! haxxor!"

Now, time to figure out this puppy.

Saturday, June 19, 2010

I told you so + Nener! Nener!

In the beginning, I suffered through Netbeans3. True, it had a slick interface and was (even then as it is now) free but it was dirt slow and was a memory hog. And so I started looking for alternatives but something told me revisit this tiny IDE. I did and that was when Netbeans5.0 was released and I was pleased. That was like 5 years ago(give or take). I was faster, slimmer and overall better.

And so I took it and ran with it, I used it in all my projects and it moved on to my classes and I eventually got it to be the universal IDE for Capitol University's College of Computer Studies. They use it for almost anything except for Assembly programming. If there is stable plugin for Assembly programming in Netbeans can somebody tell me.

In other case, they want to use the "other" IDEs. The discussion ranged from "No IDE" (just edit.com and the command line), "Yes IDE" (JEdit, eclipse, myeclipse, JBuilder, etc..) to "To each his own IDE". Now I can safely say, on what they suggested, "They got nothing on Netbeans!".

The other guys seem to agree.
So, to the people that has been my misfortune to meet who thinks that Netbeans sucked, Nener! Nener!

Wednesday, October 28, 2009

Homer Simpson on Hibernate: DAO! (Part 2)

Let's pick it up where we left off; writing code for the implementation part of our dao.

To get started, we need to get the tapestry-hibernate lib to make it easy for us to get hibernate and tapestry talking. We are going to use maven for this.

Now open you pom.xml the project file folder and add this:

 <dependency>  
       <groupId>org.apache.tapestry</groupId>  
       <artifactId>tapestry-hibernate</artifactId>  
       <version>5.1.0.5</version>  
 </dependency>  

This should be in the dependencies part of the pom file. Once you save this, it will automatically get the files for you. Remember to connect to the internet. You gotta love Maven.

We got our library, now we have to actually write the implementation code - we start with creating an impl package within the dao package and creating two Java classes namely: AddressDAOimpl and LoginDAOimpl. This Java classes implement their respective DAO interfaces.

Here is part of that AddressDAOimple.java source code.
 import org.apache.tapestry5.ioc.annotations.Inject;  
 import org.hibernate.Session;  
 /**  
  *  
  * @author killertilapia  
  */  
 public class AddressDAOimpl implements AddressDAO {  
   @Inject  
   private Session session;  
   public void add(Address newAddress) {  
     session.save(newAddress);  
   }  
   public void delete(Address address) {  
     session.delete(address);  
   }  
   public List<Address> retrieveAll() {  
     return session.createCriteria(Address.class).list();  
   }  
   public void update(Address address) {  
     session.saveOrUpdate(address);  
   }  
 }  

LoginDAOimpl contains the same idea.

It's quite simple really since Hibernate hides almost all(if not all) of the database/sql/jbdc code from us. All we really need is that session object that we injected into the class. That session object is our link to the database - think of it as an instantace of hibernate.cfg.xml.

We got the database part working now all we need is for someway to make it available to the entire web application. Enter Inversion of Control or IOC. We simply expose this thing as a service and then we can inject it into any part of the web application where we need it just like that session object earlier.

Open AppModule.java file. It should be in the services package. We first bind the DAO interfaces with their implementation file. Then we "give advice" to it using HibernateTransactionAdviser interface. This way the advice method is configured to match against any service whose id ends with "DAO", such as "PersonDAO". The advisor scans the service interface and identifies any methods with the @CommitAfter annotation. Got all that?

Here's the bind:

 public static void bind(ServiceBinder binder)  
 {  
     binder.bind(AddressDAO.class, AddressDAOimpl.class);  
     binder.bind(LoginDAO.class, LoginDAOimpl.class);  
 }  

The advisor part:
 @Match("*DAO")  
 public static void adviseTransactions(HibernateTransactionAdvisor advisor, MethodAdviceReceiver receiver) {  
     advisor.addTransactionCommitAdvice(receiver);  
 }  

And here's the @CommitAfter annotation in the DAOs:

 public interface AddressDAO {  
   @CommitAfter  
   public void add(Address newAddress);  
   @CommitAfter  
   public List<Address> retrieveAll();  
   @CommitAfter  
   public void update(Address address);  
   @CommitAfter  
   public void delete(Address address);  
 }  

See...was that so bad?

Anyway, I am putting the code into a subversion repository so you can get your bloody claws into it. Again, if you don't know what a subversion repo educate yourself. You'll probably need a kenai.com. account. Make one, its free anyway and it integrates with Netbeans6.7 quite nicely.

Sunday, October 18, 2009

Homer Simpson on Hibernate: DAO! (Part 1)

Homer's got nothing to do with this - besides he's a nuclear technician not a web developer.

This where we add our database part of our addressbook web application. This part is actually pretty long so I am going to split it into two maybe three parts.

Let's get started...

We will be using a design pattern called Data Access Objects. We will inject this as a service, exposing it to the entire web application. We will also use Hibernate for this. This will further simplify our DAO approach. If you don't know or forgot what is a design pattern or even what is a DAO, educate yourself.

We already have all the pieces - we got the database, our webapp and our IDE - all  we need is to use these pieces and work our DAO.

We begin by creating our hibernate.cfg.xml file. This file will connect us to our database where we created earlier at the beginning of this tutorial series. Where we put the file is defined by the file layout of our Tapestry5 web application. Now...

  1. Go to the Other Sources node of our project browser and locate the default package,
  2. Right-click select New and then Other. 
  3. Look for the Hibernate folder and then select Hibernate Configuration Wizard.
  4. Just accept the defaults of the first two pages until you reach the third page of the wizard where you select the data source. Select New Database Connection and supply the details more or less like the screenshot.
You should be now look at a hibernate.cfg.xml file. The next part is where we add some optional bits to our hibernate.cfg.xml file to help us debug our code later. Trust me, better to do it now than later.We could remove this bits when we deploy or we could simply leave it. Almost all of the debugging code outputs into the console anyway.
  1. Open the hibernate.cfg.xml file if its not open(duh!) and locate Optional Properties 
  2. Open that up and we will add two new properties
  3. The first property is the hibernate.show_sql (should be the first item in the combo box) and set it to true.
  4. The second one is to set hibernate.format_sql to true. This basically just pretty prints our sql statements into the console.
We got our database connection, we should start making our entities. Entities? Well, entities are object equivalents of database tables. Right now, we should be able to create two entities which are address and login which are our two tables in our database.
  1. Go to the Source Package create a new file.
  2. Now, this part will not make sense to you but just work with me. Go to Persistence and select Entity Classes from Database.
  3. Select the correct connection and select both tables.
  4. In the Entity Classes part modify the package name into edu.addressbook.entities. Don't about the project not having any persistence unit and make sure that the Generate named query annotations is check.
  5. In the Mapping Options there is one thing you need to decide on though, its the collection type. The collection type basically defines how you are going to handle rows of records containing data retrieved from the database. Now don't you wish you should have paid more attention to Sir Jay's class on data structures and algorithms class during college. Anyhow, I am selecting List for this tutorial but it doesn't really matter what you choose as long you know how to handle that data structure.
You should be looking at something that looks like the screenshot #2 after finishing the wizard. If you look at the code inside the entities you should notice is basically a POJO with bits of annotations - lots of get and set methods.

With that, we start creating our abstract interfaces for our DAO. Abstract interfaces in DAO are simply Java interfaces and we need two - one for the address entity and another one for the login entity.

Remember, Java interfaces contain "contract" methods that we implement somewhere else by implementing the interface. Here is the AddressDAO interface. There is If you notice the methods are CREATE, RETRIEVE, UPDATE and DELETE hence CRUD applications. You can also change this to synonyms like create = add; retrieveAll = findAll, etc. You get the idea.

 public interface AddressDAO {  
   public void create(Address newAddress);  
   public List<Address> retrieveAll();  
   public void update(Address address);  
   public void delete(Address address);  
 }  

The LoginDAO interface has exactly the same contents. Just change the Address entities into Login entities. And don't forget to import the List interface from the java.util package.

Now stay tune for part 2....

Monday, October 5, 2009

Sharpen that hammer, align that saw (or is that the other way around?)

Now with the address book design out of the way and we now have a goal - We move on to our Netbeans IDE. We are going to do almost everything using Netbeans, so we need to setup Netbeans for our development work.


After downloading and installing Netbeans, we should get it to recognize our MySQL instance which I assume you have installed already and have created the database already.

Now you should be looking for a tab on the left side where it says Services. Click on it and you should see a tree structure with database on it.
Right-click on the database item and you should see Register MySQL Server. It should be fairly start forward from here.


It should be something like this after.

The reason for this will become apparent later when we do the DAO section for this Tapestry5 tutorial.

Now with our database done and Netbeans recognizing it, we move on to Maven2.

Netbeans6.7 already has Maven in it. And you could just use it right away. Technically, you could safely skip this part.

For the rest of you who want to get "Mavenized"- AMEN! And accept Maven as your savior for your software development woes - AMEN! Be ready to be baptized!(say it like an evangelist preaching to a crowd)

*Turning off my preachers voice now. Lolz.

Anyway, the first step is to get acquainted with Maven, so get to its website. You see that Maven is a software project management and comprehension tool. Which simply means it manages builds, generate reports, maintains and if necessary download dependencies (and it also does other cool stuff like making toast and do the dishes). Dependencies here would mean software libraries like that MySQL driver you would need in order for your Java program to talk to a MySQL server.

Now when you are in the Maven website, do the installation guide and you might also want to do the Maven in 5 Minutes document.


After all of that, your Netbeans installation should detect the Maven installation.You might need to restart Netbeans.

Go to tools -> options -> miscellaneous -> maven to verify the detected local Maven2 installation.

Netbeans will start creating an index of the Maven central repository; it takes a while.

Remember, Maven only works if there's an internet connection.

Nice, with all of that done we should be all set to do some weaving.

Thursday, October 1, 2009

Becoming a weaver(my Tapestry course for beginners)

This blog was is motivated by two things:
  1. I needed a place for all the things I have learned using Tapestry5.
  2. I was teaching an elective course in writing web applications. The course material required me to use JSP. JSP works but I wasn't really crazy about writing a boat load of code for it to do something interesting like display data from a database.
So here we are. So the plan is I will walk you through a complete web application cycle from design to deployment using the Tapestry5 framework. We will make up the requirements and specification as we move along. *big grin*

The whole course will be something like this:
  1. What are we making? An address book (for the web) what else?
  2. Sharpen that hammer, align that saw (or is that the other way around?)
  3. Weaving that Tapestry
  4. Let's start with some basic stitches
  5. Homer Simpson on Hibernate: DAO!
  6. Automatic Housing: Tapestry's Scaffolding Components
  7. Getting that layout just right
  8. Nip/Tuck (not the show)
  9. Jetty in the shell but Tomcat in the Ghost
  10. Death by Captcha?(Bonus)
Edit: Th eprimary IDE for the project will be Netbeans.