A Maven Archetype is just fancy word for I would call a "quickstart project bundle." Its basically a complete working project that we could customize.
The steps we will be following is the same as Alex Kotchnev's blog on Netbeans + Tapestry5. Parts of it I just updated it to Netbeans6.7.
Step 1: Start by creating a new Maven project.
Step 2: Now select the Archetype from Remote Maven repositories. Locate the Tapestry 5 Quickstart Archetype(5.1.0.5).
Step 3: Fill the details out, Just make sure that Package name is edu.addressbook. This makes sure that we are looking at the same package structure when we are writing code.
This would how Netbeans be setup if everything goes well.
Remember that Tapestry5 is a Java Servelet web application. It will need an app server to make it work. Netbeans has Tomcat, JBoss, Sun Appserver, and Glassfish available. We won't be using any of it. We will be setting up Jetty. Jetty will we our development app server. But during the deployment stage you can use any app server you like after you have packaged the web application. Besides Jetty is already baked-in in our archetype, which is good since don't need to download anymore software.
Now lets setup live class reloading. Live class reload one of the coolest features that Tapestry5 has. It keeps you sane and not want to kill yourself. Live class reloading basically allows us to write code, save it and just refresh our browser. Which is really, really good compared to the traditional way of doing it - you write code, save it, restart the app server, wait for the app server to start, probably clear a cache or two sometimes, then refresh our browser to see our changes. I don't know about you, but waiting for an app server to start kinda sucks the fun out of programming.
Again, this part is the same with Alex Kotchnev's Blog but for setting up Live class reload.
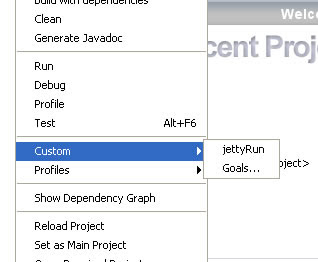
Step 1: Right click on the Project and locate the Custom -> Goals
Step 2: Let's map Jetty:Run. It should now show up in your Custom Goals.
 The default project setup comes with an Index page living in the web app context. Now that you ran Jetty, you should be able to just make changes to the template, and see them immediately. The secret here is that Jetty runs by default out of src/main/webapp, so Tapestry5 picks up the changes out of the box, no additional support by the IDE is needed.
 The problem here is that if you tried making changes to your page class (e.g. Index.java), they're not being picked up. Jetty runs from the classes in target/classes. The idea here is that we want to IDE to autocompile the changes, drop them into target/classes and have Tapestry5 pick up the new page classes.
So, go to the project properties, go to the Build-Compile section. In the panel, select from the "Compile on Save" (COS) dropdown the "for both application and test execution".
The trick to remember here is that this only works for "supported servers" (e.g. I know that at least Tomcat and Glassfish are in that list) where the IDE would compile the new classes, and re-deploy them on the server. Jetty is not one of these supported servers, and in order for the Compile-on-save goodness to work, the IDE needs to know you ran the app so that it can activate COS. Now, although you probably don't want to run the app in Tomcat , go ahead and run the app, select to run it in Tomcat. Now that you ran the app in Tomcat, NetBeans activated COS for this app, and now if you make new changes to your Index.java, NetBeans copies out the compiled classes to target/classes, and Jetty picks up the changes. After you run the app, you can just stop Tomcat (and the COS feature will continue working).
This is pretty close to perfect. Trouble is, if you have any page templates under src/main/resources, you're still out of luck, as the resources don't get copied out into target/classes after you do the initial jetty:run. But don't despair, there is just one more step that will get us there.
Locate your pom.xml file, it should be inside the Project Files folder. Add this line:
<outputDirectory>${project.build.directory}/${project.build.finalName}/WEB-INF/classes</outputDirectory>
Here's another screen-shot on how it should look.
That should to it. Thanks to Alex Kotchnev.


No comments:
Post a Comment