Thursday, December 16, 2010

FFMPEG, Ubuntu and other drugs

First off, Video support for Drupal is a dandy piece of work. They got lots of modules for that. You got:
  1. FlashVideo
  2. Video_Upload
  3. Embed
  4. And of course, Video
Now combine Video with other modules like CCK, Views, etc. You get a Drupal website that can handle Video content very well.

Unfortunately, Video which I use doesn't convert/transcode video automatically without some support.  This is where FFMPEG comes in but FFMPEG comes with a few gotchas and quid pro quo's. The default FFMPEG but  doesn't have a lot of codecs, for example, it doesn't have mp3 support.

And to make thing a bit of a challege is that FFMPEG is not on your default Ubuntu Hardy repos. So, you can't directly do an apt-get install ffmpeg and be done with it. You have to jump a few hoops first.

The first hoop is you have to edit the source.list on the apt-get souce.list.d folder. Its located in /etc/apt/source.list.d. You'll have to use a text editor to edit it; vi for the hackers, nano for novices and sorry no emacs on my Ubuntu. Just uncomment the universe and multiverse repos and then issue an apt-get update after you are done editing the source.list file.

And then the second hoop is a bit more complicated. You'll have to read FakeOutdoorman's guide to installing FFMPEG for the details here. Basically, this is the part you get codecs for FFMPEG so you can transcode a lot more stuff like hi-def videos (H264), mp3 (libmp3lame), theora, etc.

After that and a little bit more tweaking and you'll get something like this:


My setup is using Flowplayer for Drupal. The whole idea is to use CCK with Video to handle the video content and then use FFMPEG to transcode the various video formats (eg. avi, mpeg, wmv, mov, mp4, etc.) to flv. Now combine that with flowplayer to play the transcoded videos and Views + taxonomy to sort and display the video content on the site.

Just remember, Video calls FFMPEG via the command-line. FFMPEG then processes the videos and then Video handles the resulting (now converted/transcoded) video.

Thursday, November 11, 2010

XAMPP and Skype are not friends!

XAMPP and Skype are not friends! And nobody told me. They are not happy campers.

I have been using XAMPP as my development environment for a bunch of PHP projects like Drupal and Symfony. Also, XAMPP is my test application for most of my JSP applications like a registration system using Tapestry or Vaadin.

Skype. Well, I just started using Skype because some of my off shore projects use Skype. Apparently they don't think that Google talk or Yahoo! Messenger is not enough.

Now about them not playing nice - Skype uses ports that XAMPP also uses. If you try to run XAMPP Apache from the panel, it starts up then shuts down if Skype is running. So there are two solutions to this:

  1. Re-configure XAMPP Apache to use a different port. Not at difficult; you need to do this if you want to running both applications at the same time.
  2. Shut down one of them. My preferred solution. If I want to run XAMPP Apache then I have to "kill" Skype.  
Edit(7/6/2011): You can get around this now by running XAMPP first and turning on the services (Apache + MySQL) then open Skype. Skype will use a different port. 

    Sunday, November 7, 2010

    SpringHibernateVaading

    A few weeks (maybe a couple months ago - SO SUE ME!), I figured out how to get a Spring WebApplicationContext into a Vaadin application, so I tried to figure out how to get Hibernate into it with a working DAO to boot. It took a few hours but I think I have this puppy wired. Get it?

    Here's a screenshot:
    singgihpraditya blog help me get the bits working together. Spring Framework breaks your application into small bits and wire them together using XML config files. So, the magic is really in the config files.

    Now since I am using Netbeans as my development IDE, I didn't have to deploy a mySQL database for this. Netbeans has a since Derby "Sample" database - being a sample it already has data.

    Don't forget to import the derbyclient.jar. It took me a few to figure that one out. The first time around I thought that my database properties file was source of the error along with the Spring config file.

    Here is another screenshot with the web application running on Tomcat.


    Aryan, Bhadz, Cholo, Carl, Kim don't hate!

    Sunday, October 31, 2010

    JSON, Java, JSONSimple, Exposed Web services and all that jazz.

    First off JSON is fun stuff and its everywhere. JSON (JavaScript Object Notation) is a lightweight data-interchange format. It is easy for humans to read and write. It is easy for machines to parse and generate. Almost all web services when invoked return JSON data.

    Here is a sample show JSON looks like:


    There's even a 3 minute tutorial on how to understand it.

    Once you understood what JSON is, then its time to do something with it. In my case, is to process (or parse) it using Java and taking the lazy way out, use a toolkit that somebody else wrote to parse it - JSONSimple.

    The thing with JSONSimple is that it maps JSON stuff into Java Collections types like List and Map.
    Here is another sample on how to use it:
     String s="[0,{\"1\":{\"2\":{\"3\":{\"4\":[5,{\"6\":7}]}}}}]";  
     Object obj=JSONValue.parse(s);  
     JSONArray array=(JSONArray)obj;  
     System.out.println("======the 2nd element of array======");  
     System.out.println(array.get(1));  
     System.out.println();  
               
     JSONObject obj2=(JSONObject)array.get(1);  
     System.out.println("======field \"1\"==========");  
     System.out.println(obj2.get("1"));       


    See their website for more encoding and decoding examples using JSONSimple.

    Friday, September 3, 2010

    Playing with Vaadin + Spring

    A few weeks ago, I stumbled on Vaadin Framework and it came with a catchy tag-line:
    Vaadin is a Java Framework for building modern web applications that looks great, perform well, make you and your users happy.
    That got my attention and so like a kid with a new toy, I started playing around with it and try to do stuff with it. It took me a while, read a few blogs but I have managed to get the hang of Vaadin and even got it to work with Hibernate and Spring. Vaadin with Hibernate was easy to figure out but Vaadin, Spring and Hibernate along with a DAO was a bit of a bitch of figure out but I eventually did. Nicolas Fränkel's blog gave me new insight on how to approach the problem. I sort of agree with his opinions on how to get Vaadin to work with Spring as compared to the techniques posted in the Vaadin wiki page. To quote Nicolas:
    The first one uses the Helper “pattern”, a class with static method that has access to the Spring application context. IMHO, those Helper classes should be forgotten now we have DI since they completely defeat its purpose. If you need to explicitly call the Helper static method in order to get the bean, where’s the Inversion of Control?
    The second solution uses Spring proprietary annotation @Autowired in order to use DI. Since IoC is all about decoupling, I’m vehemently opposed to coupling my code to the Spring framework.
     The trick was understanding how to isolate the Spring Context from the Vaadin application. With them separated, all that was needed was configuration files.

    The thing was not to forget to configure the listener in web.xml file:
     <listener>  
         <listener-class>org.springframework.web.context.ContextLoaderListener</listener-class>  
     </listener>  
     <context-param>  
         <param-name>contextConfigLocation</param-name>  
         <!-- <param-value>classpath*:WebApplicationContext.xml</param-value> -->  
         <param-value>WEB-INF/WebApplicationContext.xml</param-value>  
     </context-param>  
    

    After that the WebApplicationContext.xml file in the WEB-INF folder.
     <?xml version="1.0" encoding="UTF-8" standalone="no"?>  
     <beans xmlns="http://www.springframework.org/schema/beans" xmlns:aop="http://www.springframework.org/schema/aop"  
          xmlns:context="http://www.springframework.org/schema/context" xmlns:tx="http://www.springframework.org/schema/tx"  
          xmlns:p="http://www.springframework.org/schema/p"  
          xmlns:xsi="http://www.w3.org/2001/XMLSchema-instance"  
          xsi:schemaLocation="http://www.springframework.org/schema/beans http://www.springframework.org/schema/beans/spring-beans-2.5.xsd  
                      http://www.springframework.org/schema/tx http://www.springframework.org/schema/tx/spring-tx-2.5.xsd  
                      http://www.springframework.org/schema/context http://www.springframework.org/schema/context/spring-context-2.5.xsd  
                      http://www.springframework.org/schema/aop http://www.springframework.org/schema/aop/spring-aop.xsd">  
          <context:property-placeholder location="classpath*:*.properties" />  
         <context:annotation-config />  
         <!-- add autowired or explicitly configured beans here -->  
         <bean id="myVaadinApplication" class="edu.chuybook.app.MyVaadinApplication"/>  
     </beans>  
    

    With that, you can start doing some really interesting stuff!

    Monday, July 12, 2010

    Web design color schemes

    You don't know this, but I suck at coming up with original web designs. I usually just rip one off from the oswd.org or somewhere. But somehow you got to evolve to become better at what you love to do and I happen to love the web.

    So I started playing around trying to understand Color until I stumbled across this pretty neat piece of software that allows me to play with color schemes. Its called ColorSchemer Studio. They also have it as a Windows sofware. It's pretty cool. You get to play around with various color schemes for various projects.

    For example, I have a new project and my clients inspiration for color is from a piece of abstract art.

    Hey, I don't really undestand it myself. But its the clients money so....

    Move on to ColorSchemer. You see ColorSchemer has this nifty little feature that can create color schemes from a picture. In this case, it was scan, digitized and saved as a high-resolution JPG file.

    Here is a screenshot of the artwork inside ColorSchemer. Notice that you get to pick colors that are already in the picture.


    Here, I am trying out the color schemes at various elements on a dummy web layout also within ColorSchemer.

    Saturday, June 19, 2010

    I told you so + Nener! Nener!

    In the beginning, I suffered through Netbeans3. True, it had a slick interface and was (even then as it is now) free but it was dirt slow and was a memory hog. And so I started looking for alternatives but something told me revisit this tiny IDE. I did and that was when Netbeans5.0 was released and I was pleased. That was like 5 years ago(give or take). I was faster, slimmer and overall better.

    And so I took it and ran with it, I used it in all my projects and it moved on to my classes and I eventually got it to be the universal IDE for Capitol University's College of Computer Studies. They use it for almost anything except for Assembly programming. If there is stable plugin for Assembly programming in Netbeans can somebody tell me.

    In other case, they want to use the "other" IDEs. The discussion ranged from "No IDE" (just edit.com and the command line), "Yes IDE" (JEdit, eclipse, myeclipse, JBuilder, etc..) to "To each his own IDE". Now I can safely say, on what they suggested, "They got nothing on Netbeans!".

    The other guys seem to agree.
    So, to the people that has been my misfortune to meet who thinks that Netbeans sucked, Nener! Nener!

    Wednesday, June 2, 2010

    Death by Captcha?

    Captcha is a type of challenge-response test used in computing to ensure that the response is not generated by a computer. The process usually involves one computer (a server) asking a user to complete a simple test which the computer is able to generate and grade. Because other computers are unable to solve the CAPTCHA, any user entering a correct solution is presumed to be human. Captcha has a lot of uses for web applications.

    In this tutorial, we are going I am going to show you one way of doing it. I'll be showing you how to integrate JCaptcha into our Tapestry5 webapp as a web service. Mr. Ship, the creator of Tapestry also a tutorial for this, its up in his blog. He is using Kaptcha.

    Now to begin with this tutorial we need to add JCaptcha as a dependency to our project. So, open up pom.xml in project files then add these lines:

     <dependencies>  
     ....  
     ....  
     <dependency>  
        <groupId>com.octo.captcha</groupId>  
        <artifactId>jcaptcha</artifactId>  
        <version>1.0</version>  
     </dependency>  
     </dependencies>  
    

    Don't forget to save it.

    The whole magic of our JCaptcha service is the interface which has two methods. In you edu.addressbook.services package create a new interface and name it JCaptchaService. The contents of which would look:

     package edu.addressbook.services;  
     import org.apache.tapestry5.StreamResponse;  
     public interface JCaptchaService {  
       public boolean isValidUserResponse(String verificationCode, String captchaId);  
       public StreamResponse generateImageChallenge(String captchaId);  
     }  
    

    You will notice that our interface has a isValidUserResponse() method - this is where our challenge is invoked. If it returns false then apparently the user on the other side might not human else if its true then we assume that the user is human.

    Following the pattern, you'll have to create a edu.addressbook.services.impl package which contains a single class: JCaptchaServiceImpl. You need to understand that we still have to do this since JCaptcha generates a StreamResponse object (via the ImageCaptchaService object) which we can redirect into Tapestry.

     public class JCaptchaServiceImpl implements JCaptchaService {  
       private final ImageCaptchaService serviceInstance;  
       public JCaptchaServiceImpl(ImageCaptchaService serviceInstance) {  
         this.serviceInstance = serviceInstance;  
       }  
       public StreamResponse generateImageChallenge(String captchaId) {  
         BufferedImage imageChallenge = serviceInstance.getImageChallengeForID(captchaId, Locale.US);  
         ByteArrayOutputStream os = new ByteArrayOutputStream();  
         try {  
           ImageIO.write(imageChallenge, "PNG", os);  
           final InputStream is = new ByteArrayInputStream(os.toByteArray());  
           return new StreamResponse() {  
             public String getContentType() {  
               return "image/png";  
             }  
             public InputStream getStream() throws IOException {  
               return is;  
             }  
             public void prepareResponse(Response response) {  
               response.setHeader("Pragma", "no-cache");  
               response.setHeader("Cache-Control", "no-cache");  
               response.setDateHeader("Expires", 0);  
             }  
           };  
         } catch (IOException e) {  
           throw new RuntimeException(e);  
         }  
       }  
       public boolean isValidUserResponse(String verificationCode, String captchaId) {  
         try {  
           return serviceInstance.validateResponseForID(captchaId, verificationCode);  
         } catch (CaptchaServiceException e) {  
           throw new RuntimeException(e);  
         }  
       }  
       public class ImageCaptchaImpl extends ImageCaptcha {  
         public static final long serialVersionUID = 1;  
         public ImageCaptchaImpl(String question, BufferedImage challenge) {  
           super(question, challenge);  
         }  
         public Boolean validateResponse(Object obj) {  
           return Boolean.FALSE;  
         }  
       }  
     }  
    

    And for the final part is positioning it in the front-end. I put this in the index.tml (and its partner index.java). The whole thing is "injected" into the page like this:

       @Inject  
       private JCaptchaService captchaService;  
       @Inject  
       private RequestGlobals requestGlobals;  
    

    and its the public methods are:

       public Link getImageURL() {  
         return resources.createActionLink("image", false);  
       }  
       //executes when image is rendered  
       public Object onImage() {  
         return captchaService.generateImageChallenge(requestGlobals.getHTTPServletRequest().getSession().getId());  
       }  
    

    This way we just make a call to the getImageURL() method in the webpage via an expansion and voila! we have a captcha image to filter which users are human or not. Here is the final line of code to be placed in the index.tml file:

      <p>Captcha Image</p>  
      <t:img src="${imageURL}" align="absmiddle" alt="Dynamic Verification Code" />  
    

    That it.

    Now remember that you can get the code at kenai using the SVN: https://svn.kenai.com/svn/addressbook-tap5~svn

    The End.

    Friday, May 7, 2010

    Jetty in the shell but Tomcat in the Ghost

    We are wrapping up this course. I am calling this entry "Jetty in the shell but Tomcat in the Ghost" because I am a fan of the "Ghost in the shell" anime series. If that doesn't make sense don't worry, it just means that you are missing a few neurons.

    We are going to talk about our deployment options for our Tapestry5 web application. We could continue using Jetty or we could shift to the more familiar Tomcat. You could make a point by arguing for other web application servers like JBoss and such. Well, JBoss uses Tomcat, so the point is moot. This entry is about deploying our seemingly done addressbook with Tomcat. 

    The first thing we need to do is pack away our project into a web application archive file or more commonly called a WAR file. Creating a WAR file in Netbeans is easy.


    Right-click on our project and select either "Build" or "Clean and Build".

    Wait for it to finish - you can track its progress in the output window if you want.

    When finish go to the project folder and locate the target folder. Open it and there should be file named AddressBook.war. This is what we will install into Tomcat.

    So, how do we deploy (or install) our application into Tomcat. There are two ways of doing this:

    1. You can simply copy the AddressBook.war file into the webapps folder within the Tomcat path. Tomcat will detect it and deploy the new web application using the filename as context. So in our case it will be deployed to /addressbook relative to the URL.

    2. or use the Tomcat manager to deploy it.

    Now this is roughly half the job. The other half is about setting up the mySQL database and configuring Apache. If you have gotten this far, you could do that already.

    So, from start to finish - a working Tapestry5 application. I hope you find this useful and inspire you to do great and wonderfull things with Tapestry.

    Wednesday, March 3, 2010

    Nip/Tuck (not the show)

    I call this part Nip/Tuck (not the show) because now we are going to make this thing look good. It will be in two parts.

    We are going to add some javascript to make it look good and use a CSS framework. When I say look good is we are going to add effects that so popular with Web2.0 websites like slide, fade and curl. For this to happen we are going to use JQuery (and probably JQueryUI) and maybe 960.gs for our CSS framework.

    I know that Tapestry ships with Prototype but *whine on* I don't like prototype *whine off*. I know I might get flamed for this but guess what, my project, my stuff, go away.

    Let's start with JQuery....

    Now, it absolutely makes no sense in recreating the wheel on how to add JQuery into our Tapestry project. With that, we are going use somebody's else's wheel: ioko + maven.

    Ioko-tapestry-commons' project, a series of GPL licensed components to assist in building tapestry websites and the easiest way to use them is to add them is by using maven (or other build systems) dependencies. Remember, we are only interested in the JQuery lib. So, power up your Netbeans6.8 and open up your pom.xml and we simply add ioko as a project dependency. Refer to the ioko-tapestry-commons website if you get lost, somehow.

    Just look for the dependencies section of the pom.xml and add these 5 line. That's right five lines!

     <dependency>  
       <groupId>uk.co.ioko</groupId>  
       <artifactId>tapestry-jquery<artifactId>  
       <version>1.5.0-jquery-1.3.2</version>  
      </dependency>  
    

    The module builds on the tapestry-javascript stack support and automatically includes jQuery in your pages. It automatically calls jQuery.noConflict() so be aware that you will need to write any jQuery code using the 'jQuery' or map it to another short hand form to avoid conflicts with Scriptaculous.

    Run with it and have fun with JQuery.

    Sunday, January 24, 2010

    Getting that layout just right

    Getting that layout just right or more like changing the layout into something else I like. That's right, changing the look of our web application. Now, since this is tutorial - we are not going to reinvent the wheel. So, no wires, drafts, sketches or whatever remotely artistic. We go the cowards way and look for a cop out. So drop that pad and pen (or pencil) and open you're browser and point it to freecsstemplates.org or oswd.org. We are going to pick one out and use it. so browse, pick and download a design.


    For me I am using a fixed-width design with two-columns from freecsstemplates.org. Its called Republic.

    Now, you should be able to read html and some css for this part. When you have figured out how the republic template works, you know its time to use it and replace ours.

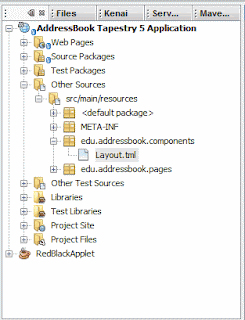
    So, we open up Tapestry's Layout component. Almost everything in Tapestry is a component. The Layout component comes in two parts - the Layout.tml (just like you see in the pic) and the Layout.java (which is the java class). Layout.java (if haven't figured it out) is in the source packages.

    Now we are going to do a simple find and replace for this part, but not everything. For example:

     <div class="post">  
       <div class="title">  
          <h2>${title}</h2>  
       </div>  
        <div class="entry">  
          <t:body/>  
        </div>  
     </div>  
    

    If you see tags like a ${title} and the <t:body/>, you should be aware that these are page variables that Tapestry will replace. So you will have to work around them to get the look you want. It should be fairly clear that anything with a "$" or "t:" prefix is connected to something in our Tapestry application.

    That should be easy.

    After recoding the html, now you need to replace the css. Now within the Web pages there should be a Layout.css file in a (duh) layout folder. Open that and then open (use notepad) layout.css of the republic template. Copy and paste over. Don't forget about the image folder. And BAM! you got a new look.

    BTW, you might need to clean the cache of your web browser and/or application server (assuming that you're using something else other than jetty *big grin*)


    This is how it should look now after a few minutes of playing around with the HTML and CSS. Don't worry if you don't like it - you could always change how the thing looks quite easily.

    Remember, if you want to get your grubby hands on the code you need to learn how to use SVN. Again, this tutorial project is hosted by kenai.com at this URL: http://kenai.com/projects/addressbook-tap.

    Hoots!