Sunday, November 22, 2009

Automatic Housing: Tapestry's Scaffolding Components

Tapestry5, if you haven't caught on, is a component-based web application framework. This means that most of its workings is based on discreet components. And the beauty of it is that we can quickly create a front-facing webpage (ala user interface) using Tapestry's "scaffolding" components. We will be using:
  • BeanEditForm - Generates a simple UI for editing the properties of a JavaBean, with the flavor of UI for each property (text field, checkbox, drop down list) determined from the property type (or by other means, such as an annotation), and the order and validation for the properties determined from annotations on the property's getter and setter methods.
  • Grid - A grid presents tabular data. It is a composite component, created in terms of several sub-components. The sub-components are statically wired to the Grid, as it provides access to the data and other models that they need. A Grid may operate inside a form.
We start with rewriting the code in four places; index(tml and java) and another(tml and java). Let's start with the index. Within the index.java source, delete all the code except for anything that has to do with the current time. Do the same with the index.tml source.
 package edu.addressbook.pages;  
 import java.util.Date;  
 import org.apache.tapestry5.annotations.InjectPage;  
 /**  
  * Start page of application AddressBook.  
  */  
 public class Index {  
   public Date getCurrentTime() {  
     return new Date();  
   }  
 }  
After all of that, we add our first scaffolding component which is the grid. The index.tml file should look like this:
 <html t:type="layout" title="AddressBook Index"  
    t:sidebarTitle="Current Time"  
    xmlns:t="http://tapestry.apache.org/schema/tapestry_5_1_0.xsd"  
    xmlns:p="tapestry:parameter">  
     <!-- Most of the page content, including <head>, <body>, etc. tags, comes from Layout.tml -->  
   <p>${message:greeting}</p>  
   <h1>List of Contacts</h1>  
   <t:grid source="addresses" row="address">  
   </t:grid>  
   <p>  
     <t:pagelink page="another">Add Contact</t:pagelink>  
   </p>  
   <p:sidebar>  
     <p>  
       Just to prove this is live:  
     </p>  
     <p>The current time is: ${currentTime}.</p>  
     <p>  
       [<t:pagelink page="Index">refresh</t:pagelink>]  
     </p>  
   </p:sidebar>  
 </html>  
And the index.java will contain this:
 package edu.addressbook.pages;  
 import edu.addressbook.entities.Address;  
 import edu.addressbook.entities.dao.AddressDAO;  
 import java.util.Date;  
 import java.util.List;  
 import org.apache.tapestry5.ioc.annotations.Inject;  
 /**  
  * Start page of application AddressBook.  
  */  
 public class Index {  
   @Inject  
   private AddressDAO addressDAO;  
   private Address address;  
   public Address getAddress() {  
     return address;  
   }  
   public void setAddress(Address address) {  
     this.address = address;  
   }  
   public List<Address> getAddresses(){  
     return addressDAO.retrieveAll();  
   }  
   public Date getCurrentTime() {  
     return new Date();  
   }  
 }  
When you reload the browser, it should go off without a hitch. Don't worry yet, it shouldn't display anything since there is no data to display. Remember, your database table is empty. We will deal with that. You will notice that there is an "Add Contact" pagelink within the index.tml file. We will use that. Edit the another.tml file to look like this.
 <html t:type="layout" title="Another"  
    t:sidebarTitle="Current Time"  
    xmlns:t="http://tapestry.apache.org/schema/tapestry_5_1_0.xsd"  
    xmlns:p="tapestry:parameter">  
     <!-- Most of the page content, including <head>, <body>, etc. tags, comes from Layout.tml -->  
   <h1>Create New Address</h1>  
   <t:BeanEditForm t:id="address" />  
   <p:sidebar>  
   </p:sidebar>  
 </html>  
You'll notice that we now are using the BeanEditForm component bind to the address object. Here's the another.java source.
 /*  
  * To change this template, choose Tools | Templates  
  * and open the template in the editor.  
  */  
 package edu.addressbook.pages;  
 import edu.addressbook.entities.Address;  
 import edu.addressbook.entities.dao.AddressDAO;  
 import org.apache.tapestry5.ioc.annotations.Inject;  
 /**  
  *  
  * @author killertilapia  
  */  
 public class Another {  
   private Address address;  
   @Inject  
   private AddressDAO addressDAO;  
   public Address getAddress() {  
     return address;  
   }  
   public void setAddress(Address address) {  
     this.address = address;  
   }  
   Object onSuccess(){  
     addressDAO.add(address);  
     return Index.class;  
   }  
 }  
You should be quick to notice that the create/update button is linked to the onSuccess() method. When the insert is successful it should return to the index page and show the newly added record. Here is a screenshot:


And you should have also noticed that the grid component of ours spills out of the page. It just has too many fields to display. You can exclude that to look like this:
 <h1>List of Contacts</h1>  
   <t:grid source="addresses" row="address" exclude="address1,address2, middlename,landphone">  
   </t:grid>  
The should fix it.

Get the latest code from the repository. And remember happy weaving.

Wednesday, October 28, 2009

Homer Simpson on Hibernate: DAO! (Part 2)

Let's pick it up where we left off; writing code for the implementation part of our dao.

To get started, we need to get the tapestry-hibernate lib to make it easy for us to get hibernate and tapestry talking. We are going to use maven for this.

Now open you pom.xml the project file folder and add this:

 <dependency>  
       <groupId>org.apache.tapestry</groupId>  
       <artifactId>tapestry-hibernate</artifactId>  
       <version>5.1.0.5</version>  
 </dependency>  

This should be in the dependencies part of the pom file. Once you save this, it will automatically get the files for you. Remember to connect to the internet. You gotta love Maven.

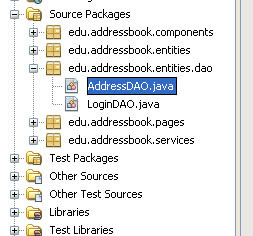
We got our library, now we have to actually write the implementation code - we start with creating an impl package within the dao package and creating two Java classes namely: AddressDAOimpl and LoginDAOimpl. This Java classes implement their respective DAO interfaces.

Here is part of that AddressDAOimple.java source code.
 import org.apache.tapestry5.ioc.annotations.Inject;  
 import org.hibernate.Session;  
 /**  
  *  
  * @author killertilapia  
  */  
 public class AddressDAOimpl implements AddressDAO {  
   @Inject  
   private Session session;  
   public void add(Address newAddress) {  
     session.save(newAddress);  
   }  
   public void delete(Address address) {  
     session.delete(address);  
   }  
   public List<Address> retrieveAll() {  
     return session.createCriteria(Address.class).list();  
   }  
   public void update(Address address) {  
     session.saveOrUpdate(address);  
   }  
 }  

LoginDAOimpl contains the same idea.

It's quite simple really since Hibernate hides almost all(if not all) of the database/sql/jbdc code from us. All we really need is that session object that we injected into the class. That session object is our link to the database - think of it as an instantace of hibernate.cfg.xml.

We got the database part working now all we need is for someway to make it available to the entire web application. Enter Inversion of Control or IOC. We simply expose this thing as a service and then we can inject it into any part of the web application where we need it just like that session object earlier.

Open AppModule.java file. It should be in the services package. We first bind the DAO interfaces with their implementation file. Then we "give advice" to it using HibernateTransactionAdviser interface. This way the advice method is configured to match against any service whose id ends with "DAO", such as "PersonDAO". The advisor scans the service interface and identifies any methods with the @CommitAfter annotation. Got all that?

Here's the bind:

 public static void bind(ServiceBinder binder)  
 {  
     binder.bind(AddressDAO.class, AddressDAOimpl.class);  
     binder.bind(LoginDAO.class, LoginDAOimpl.class);  
 }  

The advisor part:
 @Match("*DAO")  
 public static void adviseTransactions(HibernateTransactionAdvisor advisor, MethodAdviceReceiver receiver) {  
     advisor.addTransactionCommitAdvice(receiver);  
 }  

And here's the @CommitAfter annotation in the DAOs:

 public interface AddressDAO {  
   @CommitAfter  
   public void add(Address newAddress);  
   @CommitAfter  
   public List<Address> retrieveAll();  
   @CommitAfter  
   public void update(Address address);  
   @CommitAfter  
   public void delete(Address address);  
 }  

See...was that so bad?

Anyway, I am putting the code into a subversion repository so you can get your bloody claws into it. Again, if you don't know what a subversion repo educate yourself. You'll probably need a kenai.com. account. Make one, its free anyway and it integrates with Netbeans6.7 quite nicely.

Sunday, October 18, 2009

Homer Simpson on Hibernate: DAO! (Part 1)

Homer's got nothing to do with this - besides he's a nuclear technician not a web developer.

This where we add our database part of our addressbook web application. This part is actually pretty long so I am going to split it into two maybe three parts.

Let's get started...

We will be using a design pattern called Data Access Objects. We will inject this as a service, exposing it to the entire web application. We will also use Hibernate for this. This will further simplify our DAO approach. If you don't know or forgot what is a design pattern or even what is a DAO, educate yourself.

We already have all the pieces - we got the database, our webapp and our IDE - all  we need is to use these pieces and work our DAO.

We begin by creating our hibernate.cfg.xml file. This file will connect us to our database where we created earlier at the beginning of this tutorial series. Where we put the file is defined by the file layout of our Tapestry5 web application. Now...

  1. Go to the Other Sources node of our project browser and locate the default package,
  2. Right-click select New and then Other
  3. Look for the Hibernate folder and then select Hibernate Configuration Wizard.
  4. Just accept the defaults of the first two pages until you reach the third page of the wizard where you select the data source. Select New Database Connection and supply the details more or less like the screenshot.
You should be now look at a hibernate.cfg.xml file. The next part is where we add some optional bits to our hibernate.cfg.xml file to help us debug our code later. Trust me, better to do it now than later.We could remove this bits when we deploy or we could simply leave it. Almost all of the debugging code outputs into the console anyway.
  1. Open the hibernate.cfg.xml file if its not open(duh!) and locate Optional Properties 
  2. Open that up and we will add two new properties
  3. The first property is the hibernate.show_sql (should be the first item in the combo box) and set it to true.
  4. The second one is to set hibernate.format_sql to true. This basically just pretty prints our sql statements into the console.
We got our database connection, we should start making our entities. Entities? Well, entities are object equivalents of database tables. Right now, we should be able to create two entities which are address and login which are our two tables in our database.
  1. Go to the Source Package create a new file.
  2. Now, this part will not make sense to you but just work with me. Go to Persistence and select Entity Classes from Database.
  3. Select the correct connection and select both tables.
  4. In the Entity Classes part modify the package name into edu.addressbook.entities. Don't about the project not having any persistence unit and make sure that the Generate named query annotations is check.
  5. In the Mapping Options there is one thing you need to decide on though, its the collection type. The collection type basically defines how you are going to handle rows of records containing data retrieved from the database. Now don't you wish you should have paid more attention to Sir Jay's class on data structures and algorithms class during college. Anyhow, I am selecting List for this tutorial but it doesn't really matter what you choose as long you know how to handle that data structure.
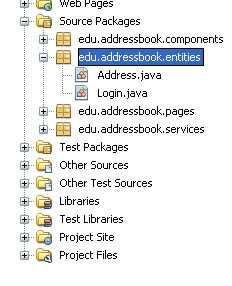
You should be looking at something that looks like the screenshot #2 after finishing the wizard. If you look at the code inside the entities you should notice is basically a POJO with bits of annotations - lots of get and set methods.

With that, we start creating our abstract interfaces for our DAO. Abstract interfaces in DAO are simply Java interfaces and we need two - one for the address entity and another one for the login entity.

Remember, Java interfaces contain "contract" methods that we implement somewhere else by implementing the interface. Here is the AddressDAO interface. There is If you notice the methods are CREATE, RETRIEVE, UPDATE and DELETE hence CRUD applications. You can also change this to synonyms like create = add; retrieveAll = findAll, etc. You get the idea.

 public interface AddressDAO {  
   public void create(Address newAddress);  
   public List<Address> retrieveAll();  
   public void update(Address address);  
   public void delete(Address address);  
 }  

The LoginDAO interface has exactly the same contents. Just change the Address entities into Login entities. And don't forget to import the List interface from the java.util package.

Now stay tune for part 2....

Thursday, October 8, 2009

Let's start with some basic stitches

Now what is the point of learning a new framework if you can't do something cool with it. Well, cool (or "choyness") will have to wait. Let's do the basics of Tapestry5 and build on that.

Now a Tapestry5 application is a set of interactive pages. Technically, a page template and a page class (ie. Index.tml and  Index.java). You will notice this when you browse your Netbeans project. The template files with the .tml extensions are essentially xhtml files. So they will accept valid html markup and css styling. The page class are just Plain Old Java Objects or POJOs. POJOs means that the class doesn't inherit from any framework-specific parent or implement any framework-specific interfaces.

There are 3 basic ideas when using the Tapestry framework.
  1. Using Expansions
  2. Using Tapestry Components
  3. And passing data between pages
Using Expansions
Let's start by opening Index.java. Now we add code to it so we can see expansions at work.

 private int someValue = 12345;  
   public int getSomeValue() {  
     return someValue;  
   }  
   public void setSomeValue(int someValue) {  
     this.someValue = someValue;  
   }  

This would be typical JavaBean class - a private class variable and a public getter and setter method for it.
Now open the equivalent page template which is, if haven't caught on, its Index.tml. Insert this code fragment somewhere in the Index.tml.

 <p>Here is the value: ${someValue}</p>  


Run the web application using our costume goal jettyRun and open a web browser. Here's a screenshot.

Using Components
To get started in using components do the Howard Ship's Tapestry tutorial. Its a quick way to get acquainted with tapestry components. Also don't forget to browse the component reference page for documentation. Just remember that when using components, you can define them in 1 of 3 ways:
  1. Explicitly in the template page
  2. Invisibly in the template page
  3. In the page class
Explicitly declaration of components:
   <t:form t:id="userInputForm">  
     <t:textfield t:value="message"/>  
   </t:form>  

Invisibly declaring components:
   <t:form t:id="userInputForm">  
     <input type="text" t:type="textField" t:value="someValue"/>  
   </t:form>  

Declaring components in the page class. Add this line to your choice of page class
   @Component(parameter = {"value=message"})  
   private TextField theTextBox;  

Then place the component in the page template.
   <t:form t:id="userInputForm">  
     <input type="text" t:id="theTextBox"/>  
   </t:form>  

You should be able to put two and two together with the third technique of using components.

And Passing data between pages
A Tapestry application is a number of related pages, working together. To some degree, each page is like an application unto itself. Read up on how Tapestry's Page Navigation works.

There is really two way of going about passing data between pages:
  1. The first way is to use the @persist annotation on a field
  2. The passivate-activate technique
Now let's say we want to pass a string message to Another page. So create a page template titled Another.tml and then create a page class titled Another.java.

The source of our string message will be just the Index page. We will add a simple textfield component to it and and the user clicks on a button it will pass the value to our Another page in which the another page will display the value.

Ok, now we will start writing code for the Index page. 

 package edu.addressbook.pages;  
 import java.util.Date;  
 import org.apache.tapestry5.annotations.InjectPage;  
 /**  
  * Start page of application AddressBook.  
  */  
 public class Index {  
   private String message;  
   private int someValue = 12345678;  
   @InjectPage  
   private Another another;  //inject the page so we can access to it  
   public String getMessage() {  
     return message;  
   }  
   public void setMessage(String message) {  
     this.message = message;  
   }  
   public int getSomeValue() {  
     return someValue;  
   }  
   public void setSomeValue(int someValue) {  
     this.someValue = someValue;  
   }  
   public Date getCurrentTime() {  
     return new Date();  
   }  
   // This is where we handle submission from the form  
   Object onSubmitFromUserInputForm(){  
     System.out.println("Handling from submission");  
     another.setPassedMessage(message);  
     return another;  
   }  
 }  

1 down. 3 more to go. Here is the code for Index page template.

 <html t:type="layout" title="AddressBook Index"  
    t:sidebarTitle="Current Time"  
    xmlns:t="http://tapestry.apache.org/schema/tapestry_5_1_0.xsd"  
    xmlns:p="tapestry:parameter">  
     <!-- Most of the page content, including <head>, <body>, etc. tags, comes from Layout.tml -->  
   <p>${message:greeting}</p>  
   <p>Here is the value: ${someValue}</p>  
   <t:form t:id="userInputForm">  
     <t:label for="message">Submit a Message  
       <t:textfield t:id="message"/>  
     </t:label>  
     <input type="submit" value="Submit" style="margin-left: 10px;"/>  
   </t:form>  
   <p:sidebar>  
     <p>  
       Just to prove this is live:  
     </p>  
     <p>The current time is: ${currentTime}.</p>  
     <p>  
       [<t:pagelink page="Index">refresh</t:pagelink>]  
     </p>  
   </p:sidebar>  
 </html>  

It should be quite easy to realize that the form on the page template (has the id of userInputForm) is connected to the onSubmitFromUserInputForm() method on the page class.

Now this is for the Another page class.
 /*  
  * To change this template, choose Tools | Templates  
  * and open the template in the editor.  
  */  
 package edu.addressbook.pages;  
 import org.apache.tapestry5.annotations.Persist;  
 /**  
  *  
  * @author killertilapia  
  */  
 public class Another {  
   @Persist            //persist the field so we can store data  
   private String passedMessage;  //in the session  
   public String getPassedMessage() {  
     return passedMessage;  
   }  
   public void setPassedMessage(String passedMessage) {  
     this.passedMessage = passedMessage;  
   }  
 }  

Notice the public method of setPassedMessage(), this is the one being accessed by the Index page class so we can show the passed value.

The final piece of this puzzle is the Another page template.
 <html t:type="layout" title="Another"  
    t:sidebarTitle="Current Time"  
    xmlns:t="http://tapestry.apache.org/schema/tapestry_5_1_0.xsd"  
    xmlns:p="tapestry:parameter">  
     <!-- Most of the page content, including <head>, <body>, etc. tags, comes from Layout.tml -->  
   <p>Message passed: ${passedMessage}</p>  
   <p:sidebar>  
   </p:sidebar>  
 </html>  

If you are running already the web application (using the jettyRun goal) all you need to do is just refresh the web browser. You should see now the index page. Here is the screenshot:


Just type-in a simple message then click on the submit button. It would then go to the Another page and display our message that you just typed in the text field in the Index page.

Have fun with it.

Now as for the passivate-activate technique. I will show this teachnique when we take up the scaffolding components section of this tutorial.

Monday, October 5, 2009

Weaving that Tapestry

Starting web applications with Tapestry5 is a breeze. Now remember we have setup Maven2, right? We are now going to use it to get a Tapestry5 "archetype" from the Maven central repositories.

A Maven Archetype is just fancy word for I would call a "quickstart project bundle." Its basically a complete working project that we could customize.

The steps we will be following is the same as Alex Kotchnev's blog on Netbeans + Tapestry5. Parts of it I just updated it to Netbeans6.7.


Step 1: Start by creating a new Maven project.


Step 2: Now select the Archetype from Remote Maven repositories. Locate the Tapestry 5 Quickstart Archetype(5.1.0.5).


Step 3: Fill the details out, Just make sure that Package name is edu.addressbook. This makes sure that we are looking at the same package structure when we are writing code.


This would how Netbeans be setup if everything goes well.

Remember that Tapestry5 is a Java Servelet web application. It will need an app server to make it work. Netbeans has Tomcat, JBoss, Sun Appserver, and Glassfish available. We won't be using any of it. We will be setting up Jetty. Jetty will we our development app server. But during the deployment stage you can use any app server you like after you have packaged the web application. Besides Jetty is already baked-in in our archetype, which is good since don't need to download anymore software.

Now lets setup live class reloading. Live class reload one of the coolest features that Tapestry5 has. It keeps you sane and not want to kill yourself. Live class reloading basically allows us to write code, save it and just refresh our browser. Which is really, really good compared to the traditional way of doing it - you write code, save it, restart the app server, wait for the app server to start, probably clear a cache or two sometimes, then refresh our browser to see our changes. I don't know about you, but waiting for an app server to start kinda sucks the fun out of programming.

Again, this part is the same with Alex Kotchnev's Blog but for setting up Live class reload.


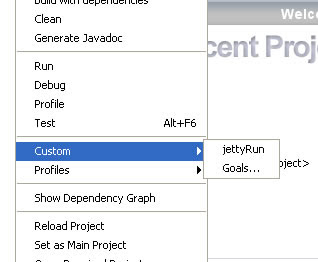
Step 1: Right click on the Project and locate the Custom -> Goals


Step 2:  Let's map Jetty:Run. It should now show up in your Custom Goals.


The default project setup comes with an Index page living in the web app context. Now that you ran Jetty, you should be able to just make changes to the template, and see them immediately. The secret here is that Jetty runs by default out of src/main/webapp, so Tapestry5 picks up the changes out of the box, no additional support by the IDE is needed.

The problem here is that if you tried making changes to your page class (e.g. Index.java), they're not being picked up. Jetty runs from the classes in target/classes. The idea here is that we want to IDE to autocompile the changes, drop them into target/classes and have Tapestry5 pick up the new page classes.


So, go to the project properties, go to the Build-Compile section. In the panel, select from the "Compile on Save" (COS) dropdown the "for both application and test execution".

The trick to remember here is that this only works for "supported servers" (e.g. I know that at least Tomcat and Glassfish are in that list) where the IDE would compile the new classes, and re-deploy them on the server. Jetty is not one of these supported servers, and in order for the Compile-on-save goodness to work, the IDE needs to know you ran the app so that it can activate COS. Now, although you probably don't want to run the app in Tomcat , go ahead and run the app, select to run it in Tomcat. Now that you ran the app in Tomcat, NetBeans activated COS for this app, and now if you make new changes to your Index.java, NetBeans copies out the compiled classes to target/classes, and Jetty picks up the changes. After you run the app, you can just stop Tomcat (and the COS feature will continue working).

This is pretty close to perfect. Trouble is, if you have any page templates under src/main/resources, you're still out of luck, as the resources don't get copied out into target/classes after you do the initial jetty:run. But don't despair, there is just one more step that will get us there.

Locate your pom.xml file, it should be inside the Project Files folder. Add this line:
 <outputDirectory>${project.build.directory}/${project.build.finalName}/WEB-INF/classes</outputDirectory>   


Here's another screen-shot on how it should look.

That should to it. Thanks to Alex Kotchnev.


Here's the final screen-shot of the first run of our project in Firefox3.5.

Sharpen that hammer, align that saw (or is that the other way around?)

Now with the address book design out of the way and we now have a goal - We move on to our Netbeans IDE. We are going to do almost everything using Netbeans, so we need to setup Netbeans for our development work.


After downloading and installing Netbeans, we should get it to recognize our MySQL instance which I assume you have installed already and have created the database already.

Now you should be looking for a tab on the left side where it says Services. Click on it and you should see a tree structure with database on it.
Right-click on the database item and you should see Register MySQL Server. It should be fairly start forward from here.


It should be something like this after.

The reason for this will become apparent later when we do the DAO section for this Tapestry5 tutorial.

Now with our database done and Netbeans recognizing it, we move on to Maven2.

Netbeans6.7 already has Maven in it. And you could just use it right away. Technically, you could safely skip this part.

For the rest of you who want to get "Mavenized"- AMEN! And accept Maven as your savior for your software development woes - AMEN! Be ready to be baptized!(say it like an evangelist preaching to a crowd)

*Turning off my preachers voice now. Lolz.

Anyway, the first step is to get acquainted with Maven, so get to its website. You see that Maven is a software project management and comprehension tool. Which simply means it manages builds, generate reports, maintains and if necessary download dependencies (and it also does other cool stuff like making toast and do the dishes). Dependencies here would mean software libraries like that MySQL driver you would need in order for your Java program to talk to a MySQL server.

Now when you are in the Maven website, do the installation guide and you might also want to do the Maven in 5 Minutes document.


After all of that, your Netbeans installation should detect the Maven installation.You might need to restart Netbeans.

Go to tools -> options -> miscellaneous -> maven to verify the detected local Maven2 installation.

Netbeans will start creating an index of the Maven central repository; it takes a while.

Remember, Maven only works if there's an internet connection.

Nice, with all of that done we should be all set to do some weaving.

Sunday, October 4, 2009

What are we making? An address book (for the web) what else?

Why an address book? Why not? It has all the vitamins and minerals that a growing, learning, aspiring programmer needs. Well, OK, not really. Anyway, it's a pretty good starting point for programmers to learn Tapestry5. This address book project of ours will also use  a lot of open-source technology goodies. We got Hibernate for as our ORM, MySQL for our database, and of course Tapestry5.

We will be using Netbeans, not Eclipse.  My employer (Capitol University) uses Netbeans for everything (ie. Java, C/C++, php, JavaME), why not use it? You could use eclipse though.

You only need to download MySQL, Maven2 and Netbeans. The other stuff, libraries will be managed by Maven.


Now for the address book. The plan is a simple CRUD application with some basic security, nothing overly complicated. We will be using two tables: Address and Login.

Technically its not the most efficient design but it will work for our purposes. This should be enough as our starting point.

Remember - "specify some, code some then repeat until project complete."


Address Table Details

Login Table Details

Thursday, October 1, 2009

Becoming a weaver(my Tapestry course for beginners)

This blog was is motivated by two things:
  1. I needed a place for all the things I have learned using Tapestry5.
  2. I was teaching an elective course in writing web applications. The course material required me to use JSP. JSP works but I wasn't really crazy about writing a boat load of code for it to do something interesting like display data from a database.
So here we are. So the plan is I will walk you through a complete web application cycle from design to deployment using the Tapestry5 framework. We will make up the requirements and specification as we move along. *big grin*

The whole course will be something like this:
  1. What are we making? An address book (for the web) what else?
  2. Sharpen that hammer, align that saw (or is that the other way around?)
  3. Weaving that Tapestry
  4. Let's start with some basic stitches
  5. Homer Simpson on Hibernate: DAO!
  6. Automatic Housing: Tapestry's Scaffolding Components
  7. Getting that layout just right
  8. Nip/Tuck (not the show)
  9. Jetty in the shell but Tomcat in the Ghost
  10. Death by Captcha?(Bonus)
Edit: Th eprimary IDE for the project will be Netbeans.

    Wednesday, September 30, 2009

    what exactly is angwebampgonnakillsomebody?

    angwebampgonnakillsomebody? I made that up or more like it just jumped out. It basically represents the frustration I feel some days writing code for the web.

    It's that feeling where you read the documentation and tried a few samples then move on to try it in your project and guess what - it doesn't f***ing work.

    "ang web A.M.P GONNA KILL SOMEBODY!"